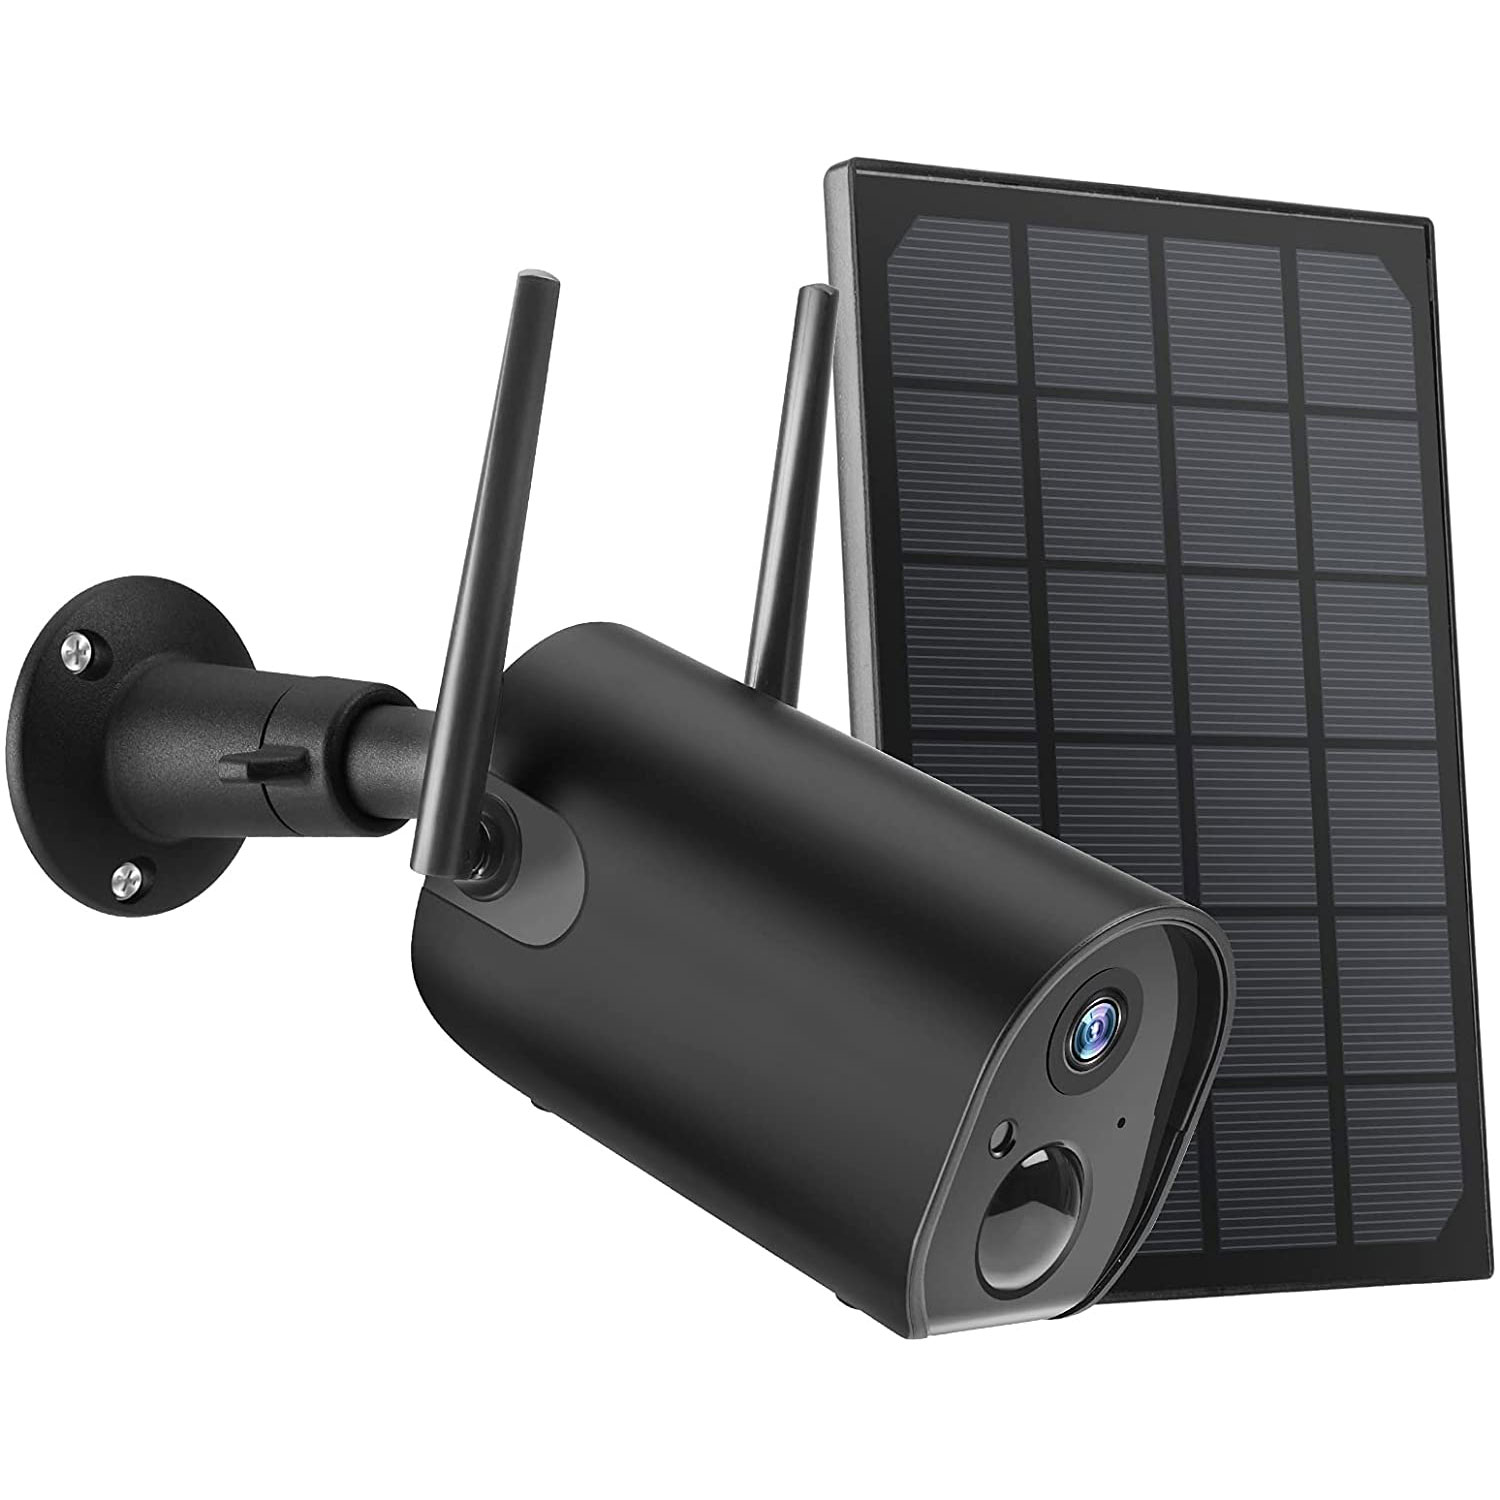
Elemage ZS-GX6S Wireless WiFi Solar Security Camera User Manual
Statement
- Although every effort is made to make the manuals complete and accurate, there may be some discrepancies due to product updates.
- Products and manuals are subject to change without notice.
- The contents of this manual are for reference only and we do not guarantee that the accessories or app will be exactly the same as the one you receive.
- If you have any problems with your camera, please feel free to contact us for assistance. We are always available to answer any questions you may have.
Contact Us
7/24 Service Email:sales@kattcamlife.com
I. Product introduction
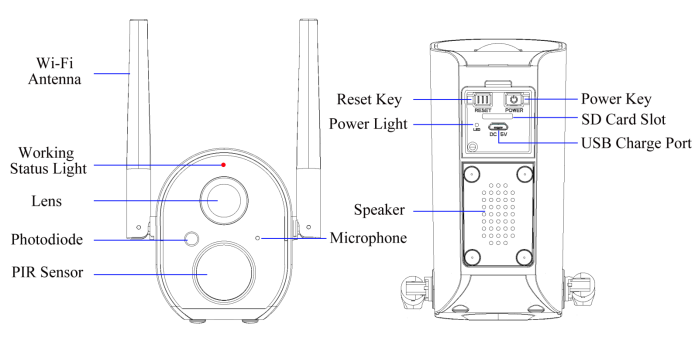
|
Power Key |
Press and hold the power button for 5 seconds to turn on the camera |
|
Reset Key |
Press and hold RESET for 5 seconds to reset the device (if you have modified the settings, they will revert to the factory default settings) |
|
SD Card Slot |
Support local SD card storage (up to 128G) |
|
Lens |
Support FHD 1080P resolution |
|
Power Light |
Red means charging is in progress Blue means charging is complete |
|
Microphone |
Capture sound for your videos |
|
PIR Sensor |
Can detect moving objects up to 12 meters away |
|
Working Status Light |
Red light continuously on: camera network abnormal Red light flashing slowly: waiting for Wi-Fi connection Red light flashing fast: Wi-Fi connection in progress Blue light continuously on: camera is running normally |
|
Speaker |
Two-way voice call sound output |
|
USB Charge Port |
Use 5V/2A power supply to charge the camera |
II. Add camera to APP
1.Download "CloudEdge" APP
Search " CloudEdge" in App Store or Google Play, or scan the QR code below to download and install it on your smartphone.

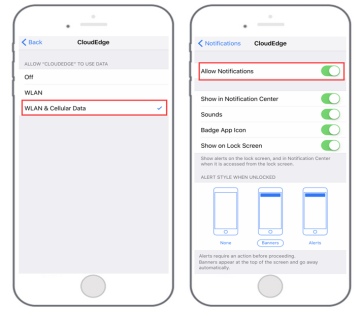
Note: When using the application for the first time, please turn on the following 2 permissions.
Allow "CloudEdge" to access mobile cellular data and WLAN, otherwise you will not be able to add devices.
Allow "CloudEdge" to receive messages, otherwise the phone will not receive alert push notifications when motion detection or audible alerts are triggered.
The following is a screenshot of IOS cell phone operation, Android cell phone permissions open method is basically the same as this method.
2.Register Account
New users must register by email. 1. Click on "Register"; 2. Follow the steps to complete your account registration; 3. Login.
Tip: ①Please use the correct e-mail. ②Please select the correct country code. ③When registering for a new account, please select the region where you are actually located. (Cameras cannot be shared between different registration regions.)
3.Camera power on
Find the camera's power-on button and press and hold it for five seconds,and you can hear the power-on tone, then the working indicator light up, red light slow flashing with 2 times per second rhythm. (If the working status light is not red slow flashing, please Reset the device)
What if the camera cannot be turned on?
1.Try to charge the device and then turn it on again.
2.Please try several times to hold down the power key Continuously.
3.Contact Customer Service
4.Connect WI-FI Steps
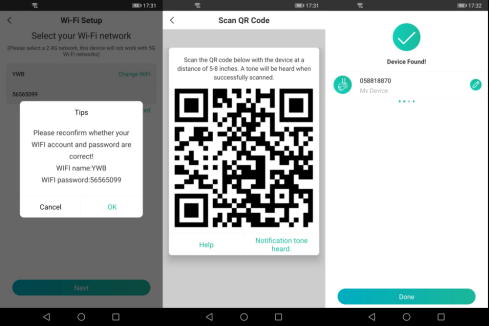
Step 1: Place the camera and smartphone within 1 to 3 feet (30 to 100 cm) of the router to ensure strong Wi-Fi signal.
Note: The camera only works with 2.4G Wi-Fi and does not support 5G Wi-Fi.
Step 2: Run the "CloudEdge" application, click and select "Battery Camera".
Step 3: Follow the prompts to ensure that the camera is turned on. (The indicator turns red and blinks slowly)
Step 4: Select the 2.4Ghz Wi-Fi SSID and enter the password, click "Next"
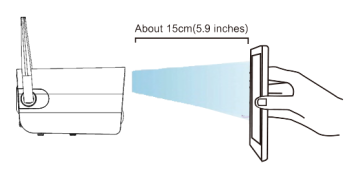
Step 5: Align the QR code with the camera lens at a distance of 10-15cm (3.9-5.9inch) until the QR code is recognized. After you hear the "Bugu" sound, click "Notification tone heard".
Step 6: After you click "Notification tone heard", the camera will start connecting to Wi-Fi. Once the connection is complete, the app will jump to the "Device Found!" page where you can edit the camera name. Then click "Done" to switch to "Devices" and now you can watch live video.
Processing Steps Of Camera and WI-FI connection failure:
- Please make sure you are using 2.4GHz WI-FI. In our experience, most users failto connect the WI-FI because of selecting 5GHz WIFI and adding the camera If you don't know how to distinguish between the 2.4 GHz and 5 GHz WI-FI names on your router, we suggest you Google the answer.
- Make sure you use the correct Wi-Fi password and a fastWI-FI network.
- Make sure the QR code on the phone screen is normal and the distance between the phone and the camera lens is 10-15cm (3.9-5.9inch) during the scanning process.
- Restore the product to factory settings, restart the router, and then add it again.
- After multiple attempts have failed, please contact customer service.
III. Mounting the camera to the wall
Note: In order to obtain the best product performance and avoid unnecessary environmental disturbances, please pay attention to the following during the installation process:
1.Do not install the product nearly to the heat sources, such as outdoor units of air conditioners, kitchen exhausts, etc.
2.Make sure there are no reflections within 5 feet (1.5 meters) of the PIR sensor, otherwise it will interfere with the normal function of the sensor.
3.Try to avoid installing the product on the side of a lively road. Frequent pedestrians and vehicles will keep waking up the camera, resulting in frequent alarm messages and extremely fast power consumption.
4.Do not install the product very far from the router, the product needs a good WI-FI signal to work properly.
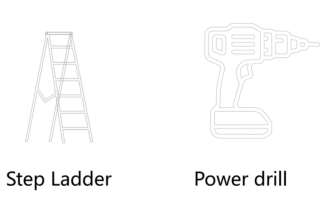
Tools needed:
Step 1: Select the location where you need to install the camera, take the camera and the phone to the location, and use the "Installation Guide" in the application to diagnose the network and determine whether the WI-FI signal at the location is good.
It is recommended to install the camera in a location with good WI-FI signal for smooth camera operation.
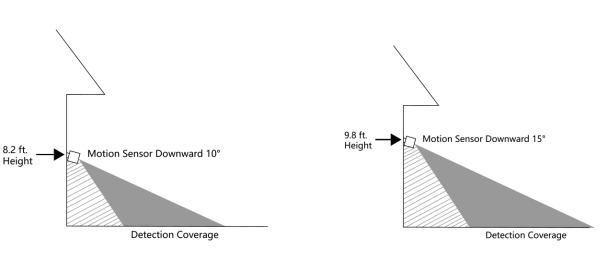
Step 2: Use Power Drill and screws. Secure the camera metal bracket to the wall, 8-10 feet off the ground (2.4m-3m) is recommended.
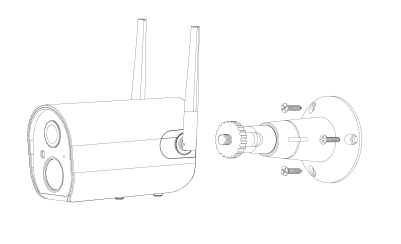
Recommended installation height: 8-10 feet (2.4m-3m) from the ground, at this height the sensor will provide a maximum detection distance of 35 feet (10m). For the best coverage, you can adjust the vertical angle of the camera to the appropriate angle. We recommend tilting the camera down at an angle of 15°.
IV. Function introduction
1.Main Page
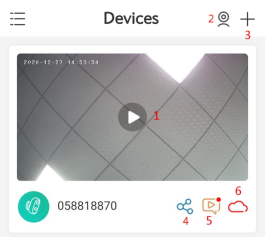
|
1.Go to the video view page |
|
2.Simultaneous playback of four screens |
|
3.Adding Devices |
|
4.Device Sharing |
|
5.View alarm pictures and video |
|
6.Cloud Storage |
2. Preview page
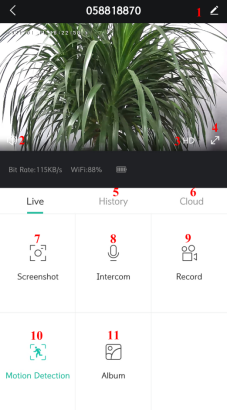
|
1.Parameter settings (alarm settings, video, lighting, device information, firmware upgrade, etc.) |
|
2.Turn the microphone on/off |
|
3.Video definition settings (SD, HD options) |
|
4.Full screen display |
|
5.SD card video playback |
|
6.Cloud Storage Video Playback |
|
7.Manual Screen-shot |
|
8.Voice intercom (long press to talk) |
|
9.Manually capture video clips |
|
10.Turn on/off motion detection |
|
11.Albums (store screen-shots and manual video files) |
Tip: Stretch the video screen with two fingers to zoom in on the image and view image details.
3.Video replay page
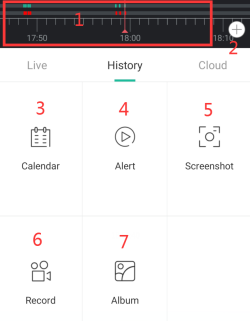
|
1.Video timeline with drag-and-drop time selection |
|
2.Timeline zoom button |
|
3.Select video playback date |
|
4.Select alarm video clips |
|
5.Video Screen-shot |
|
6.Record video, first click to start recording, click again to end recording |
|
7.Save video screen-shots and recorded videos |
4.Setup page
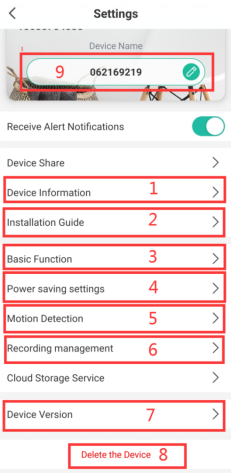
|
1.Get device information (network information, Mac address, time zone) |
|
2.Installation Guide, Network Diagnostics |
|
3.Turn off the light, night vision settings, check the battery level |
|
4.Set the length of recording, alarm interval, optimize the battery life |
|
5.Motion detection settings, adjust the detection sensitivity, etc. |
|
6.Video settings, view SD card capacity, format |
|
7.Device firmware version information, version upgrade |
|
8.Delete the device and operate it before rewiring |
|
9.Modify device name |
5.Device Sharing
Others share camera steps:
This function can be achieved through "Device Share". 1) Invite your friends to download and install "CloudEdge" APP and login. 2) Click the "Device Share" icon to watch the operation video, and then follow the steps to complete device sharing.
Tip: When sharing, please make sure the APP account is registered in the same region. Otherwise, you will not be able to share successfully.
6.SD card recording
This product does not include an SD card. If you need an SD card to store your files, please purchase it by yourself.
SD card requirements:
- Recommend the use of brand name cards such as San Disk, Samsung, etc.
- Support 2-128GB capacity;
- Recommend the use of standard Class 10 SD cards.
- Only FAT32 format is supported.
Note: Insert the memory card into the SD card slot of the device and the device will automatically start saving the video.
How to watch videos on SD card:
- Click the "History" or "Alert" button on the alarm information icon in the app to enter the video playback interface. Drag the timeline or select the alarm point to find the corresponding time period you want to record.
- Insert the SD card into your computer. The video file is in MP4 format. You can play the video directly using theviedo
7.PIR motion detection settings
Enter the application - "Settings" - "Motion Detection" interface, you can adjust the motion detection settings.
The device is used for 10 Levels of PIR motion detection sensitivity.
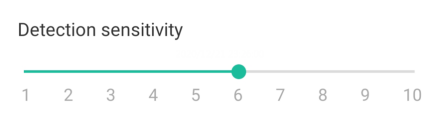
|
Sensitivity |
Detecting Distance(For moving objects) |
|
Level 1-3 (Low) |
Up to 4-5 meters |
|
Level 4-7 (Mid) |
Up to 5-8 meters |
|
Level 8-10(High) |
Up to 8-13 meters |
Warm tips: You can adjust the sensitivity of the motion detection to solve the following problems when using this product in the process .
1.If the phone receives alarm messages too often, the camera will greatly consume battery power. It is recommended to adjust the motion detection sensitivity downward and set the alarm interval to turn on the alarm plan.
2.If it is found that the phone frequently receives alarm pictures without moving objects, there may be sensitive heat sources within the range of motion detection, resulting in PIR false triggering, it is recommended to adjust the sensitivity of motion detection downward.
3.If you detect someone passing in front of the camera but cannot receive an alarm message, it is recommended to adjust the motion detection sensitivity upwards to increase the PIR detection range.
4.If you find that the alarm picture or video has a delay, or you can only see the back of the person, it is recommended to adjust the motion detection sensitivity upward.
5.PIR sensor will be interfered by the ambient temperature, it is recommended to adjust the sensitivity of motion detection upwards in hot temperature environment and downwards in cold temperature environment. At the same time in very low temperatures, heavy clothing will hinder the PIR sensor detection.
6.Sunlight UV rays will interfere with the PIR sensor, the camera's PIR in the case of direct exposure to strong sunlight, there is a probability that the alarm is not sensitive and other undesirable phenomena.
7.If you notice poor motion detection performance in nighttime environments, try turning off "Night Detection".
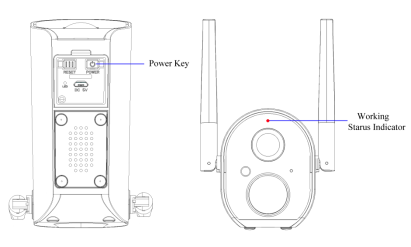
8.Battery Management
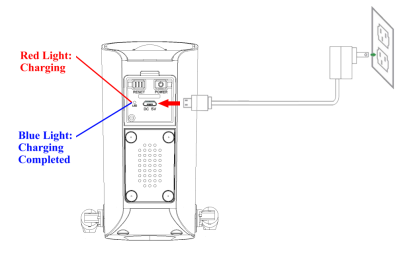
1.Charging the camera
It is recommended to use a 5V/2A power adapter for charging, connect the USB charging cable that comes with the product, and plug the charging cable into the USB charging port of the device.
Note: If there is no 5V/2A power adapter, other specifications of 5V power head can also be charged.
How to determine if the charge is successful?
The device's charging indicator lights up in red to indicate charging is in progress. The charging indicator lights up in blue, which means charging is complete. It takes about 10 hours or more to fully charge.
What if the charge fails?
1.Determine whether the power adapter is good and try a different one.
2.Determine whether the USB charging cable is good and try a different one.
3.The charging indicator may be defective, check in the phone app to see if it is charging.
4.Determine if the device's charging port is poorly disconnected from the USB charging cable.
5.The device has a low temperature charging protection module, please do not charge the device at low temperature.
6.Contact Customer Service.
2.Battery life
If the device does not detect a moving object, the device will go into sleep mode to reduce the power consumption of the device.
If the device detects a moving object, it quickly wakes up and starts within 1 second and takes a screen-shot and records a video.
Warm tip: The device uses a ternary lithium battery, when the battery is in a low-temperature environment, the internal chemicals of the battery will slowly solidify, the battery charging and discharging performance slows down, resulting in a decrease in the capacity of the battery, the life of the device will be seriously reduced.And the lower the temperature, the lower the battery capacity will be, when the temperature is below -20 degrees, the battery has the probability to enter the self-protection mode and shut down. But if the temperature rises, the battery will automatically return to its normal state.
In cold winter, if the device needs to be charged, it is recommended to take the device back inside the house and set it aside for an hour, the warm air in the house will pull up the temperature of the battery before the charging action. Then recharge it.
Why does the device have a poor battery life?
1.The working time of the device determines the battery life. The more frequently the PIR wakes up and the number of alarms, the longer the working time of the device. Please check whether the number of alarms is too frequent. It is recommended to adjust the motion detection sensitivity of the device appropriately and set the alarm interval and alarm time plan.
2.Check whether there are objects within the field of view of the device that interfere with and trigger the PIR sensor, such as outdoor units of air conditioners, moving cars, passing pedestrians, etc. The angle of the device can be adjusted appropriately to avoid these objects prone to cause interference
3.The battery capacity will be reduced in cold weather, which will affect the range of the device.
4.Contact Customer Service.
V. FAQs
For more detailed FAQs, please log in the APP, "Me"-"FAQ"-"Battery Camera".
Device prompted offline?
- Check whether the equipment is in the energized state and observe whether the working light of the equipment lights up normally.
- Check whetherthe WIFI network is good and restart the router.
- If the location of the device according to the router is far away, resulting in the inability to obtain a good WIFI signal, it is recommended to move the router to a closer location, or add a WIFI amplifier to enhance the homeWIFI performance.
- Remove the floodlight camera from your CloudEdge account, Reset the device, and then re-add it.
- Check that the device firmware and applications are up to date.
Update router or WIFI password?
Remove the floodlight camera from your CloudEdge account, Reset the device and re-add it with a new WIFI or password.
Can't play history videos?
- Check the status of SD card in "Settings"and make sure the SD card is successfully recognized.
- Reinsert the SD card.
- In the application, format the SD card.
- Try another new SD card.
Frequent alarm?
1.Open the application, turn down the motion detection alarm sensitivity.
2.Check whether there are objects within the field of view of the device that interfere with and trigger the PIR sensor, such as outdoor units of air conditioners, moving cars, passing pedestrians, etc. The angle of the device can be adjusted appropriately to avoid these easy to interfere with objects
3.Enable "The Alert will be triggered only when human motion is detected" to filter useless alarms using humanoid algorithm.
Can't receive alarm on your phone?
1In the system settings of the phone, turn on the push permission of "CloudEdge" application.
2.Ensure that the device's motion detection feature is successfully enabled.
3.Restart your phone and try clearing the cache on your Android phone.
4.Check if the network is good.